You may wonder why you want to set up your server at home. In today's world, this has many advantages.
I've wanted to set up my server for my needs for a while now but never found the time or how to. Well, last week I finally made it happen, and currently, it's working for me (the server, make no mistake).
First, the advantages of having your server:
The data is only yours, everything you have stored on your computer you know until you access it.
You can configure it as you wish, you are not tied to a service provider
It is cheap to set up and maintain
But what can be the disadvantages of one's own server

Before presenting how my server works, I will present what Nextcloud is. Nextcloud is open-source software that allows us to build our digital cloud.
Nextcloud is an excellent alternative to big fishes like Dropbox, Office 365 and Google Drive, as it allows for a massive amount of expansion and many extra functions that are unavailable in any of the commercial programs listed above.

The software also has the option of installing a tool for group file editing and an online editor of documents, layouts, and tables like that of Microsoft Office. Nextcloud also allows you to make video calls and send direct messages.
By adding plugins, Nextcloud can become the ultimate productivity tool.
Nextcloud is also used in companies and also in the German government and schools.
How do I set up my server?
I've taken tons of photos in my life, and last year Google Photos introduced a photo upload limit. So, some time ago, I ran out of space in the Google Photo service. So, I had one computer at home, which I did not use in principle, and I installed the Ubuntu operating system.
I chose the Ubuntu operating system because it is used and because it has a nice graphical interface (if I ever decide to take my computer with me).
First, it was necessary to update all packages to the latest version.
How I went about installing Nextcloud on Ubuntu.
There is already a package for easy installation of Nextcloud in the Snap online market and it contains everything we need (installation package link).
All we have to do is install this package. The easiest way to do this is with a simple command.
sudo snap install nextcloud
Then, inside my home local network, I entered the IP address of my computer in the web browser installed Nextcloud to the end and created a user account to access the installation.
Such an installation is only available within a local network? But what if I want to access my “cloud” also from some other network?
There are many solutions for this as well, from redirecting your router to a suitable computer, setting up a VPN server at home or tunnelling. Tuning turned out to be the most optimal and cheapest solution for me.
I always host my domains with Cloudflare because it gives me many free features. Some free services are CDN with unlimited bandwidth, static website hosting, DNS domain hosting with unlimited DNS records, Cloudflare Tunnels, DDoS website protection…
Cloudflare Tunnels
Usually, to access your server at home in a private network, you need a static IP and port forwarding on the router.
But there are tunnels in the networking. Like in the real world, tunnels are designed to overcome obstacles. In our case, the obstacle is our local network. Network tunnels allow us to create secure connections to our application on the server, something like a VPN.
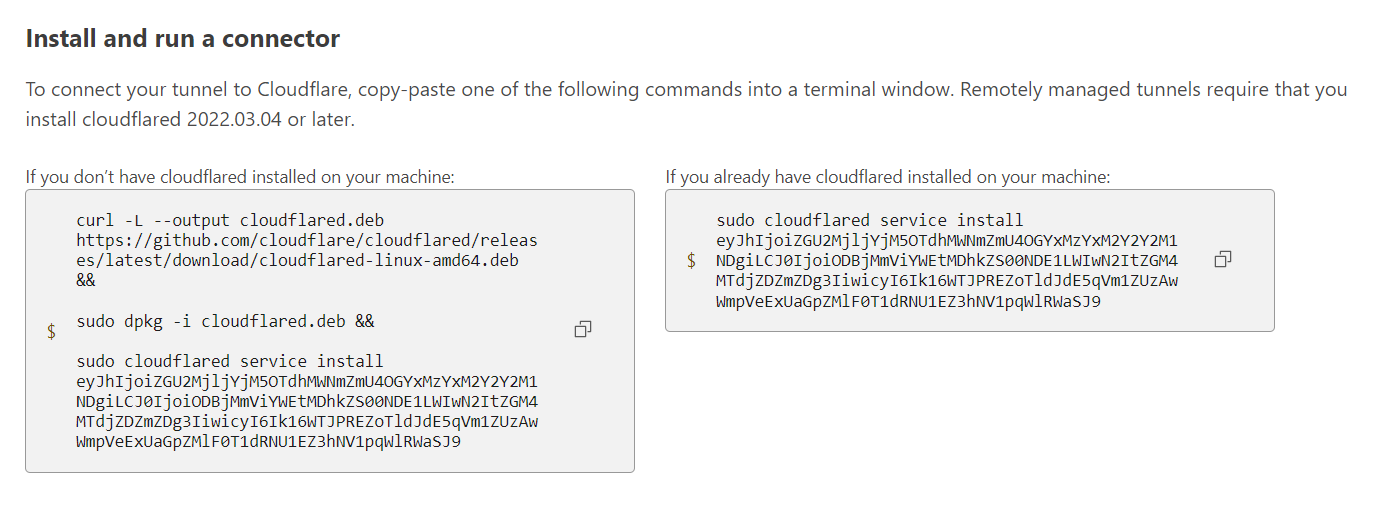
In case we already have our domain on Cloudflare DNS, then creating tunnels is accessible like a cake. We only need to install the Cloudflare application on the device (only one command on Linux) and then we can set up the applications hosted on the device in the Cloudflare GUI.
The first step of installing Cloudflare Tunnels. We must install this little package into our system.
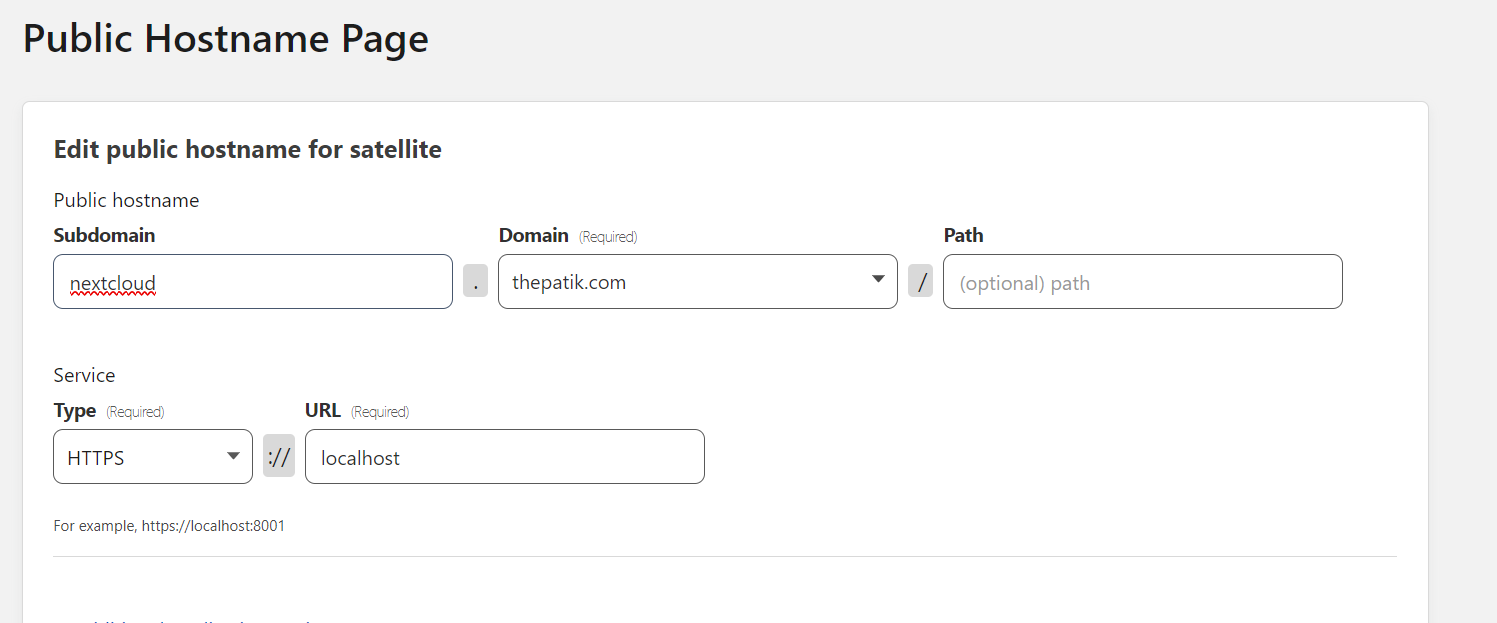
And then set our public hostnames. What is simple, is just enter the subdomain of the domain which we like and then set the hostname on the device URL.
We can use Cloudflare Tunnels for SSH or RDP access to our machine.
The function is also proper when we want to show a prototype of our product.
I hope this article helped you to discover how easy it is to set up your own media server.
Till next time 👋.